基于Ruia快速实现一个以Hacker News为目标的爬虫
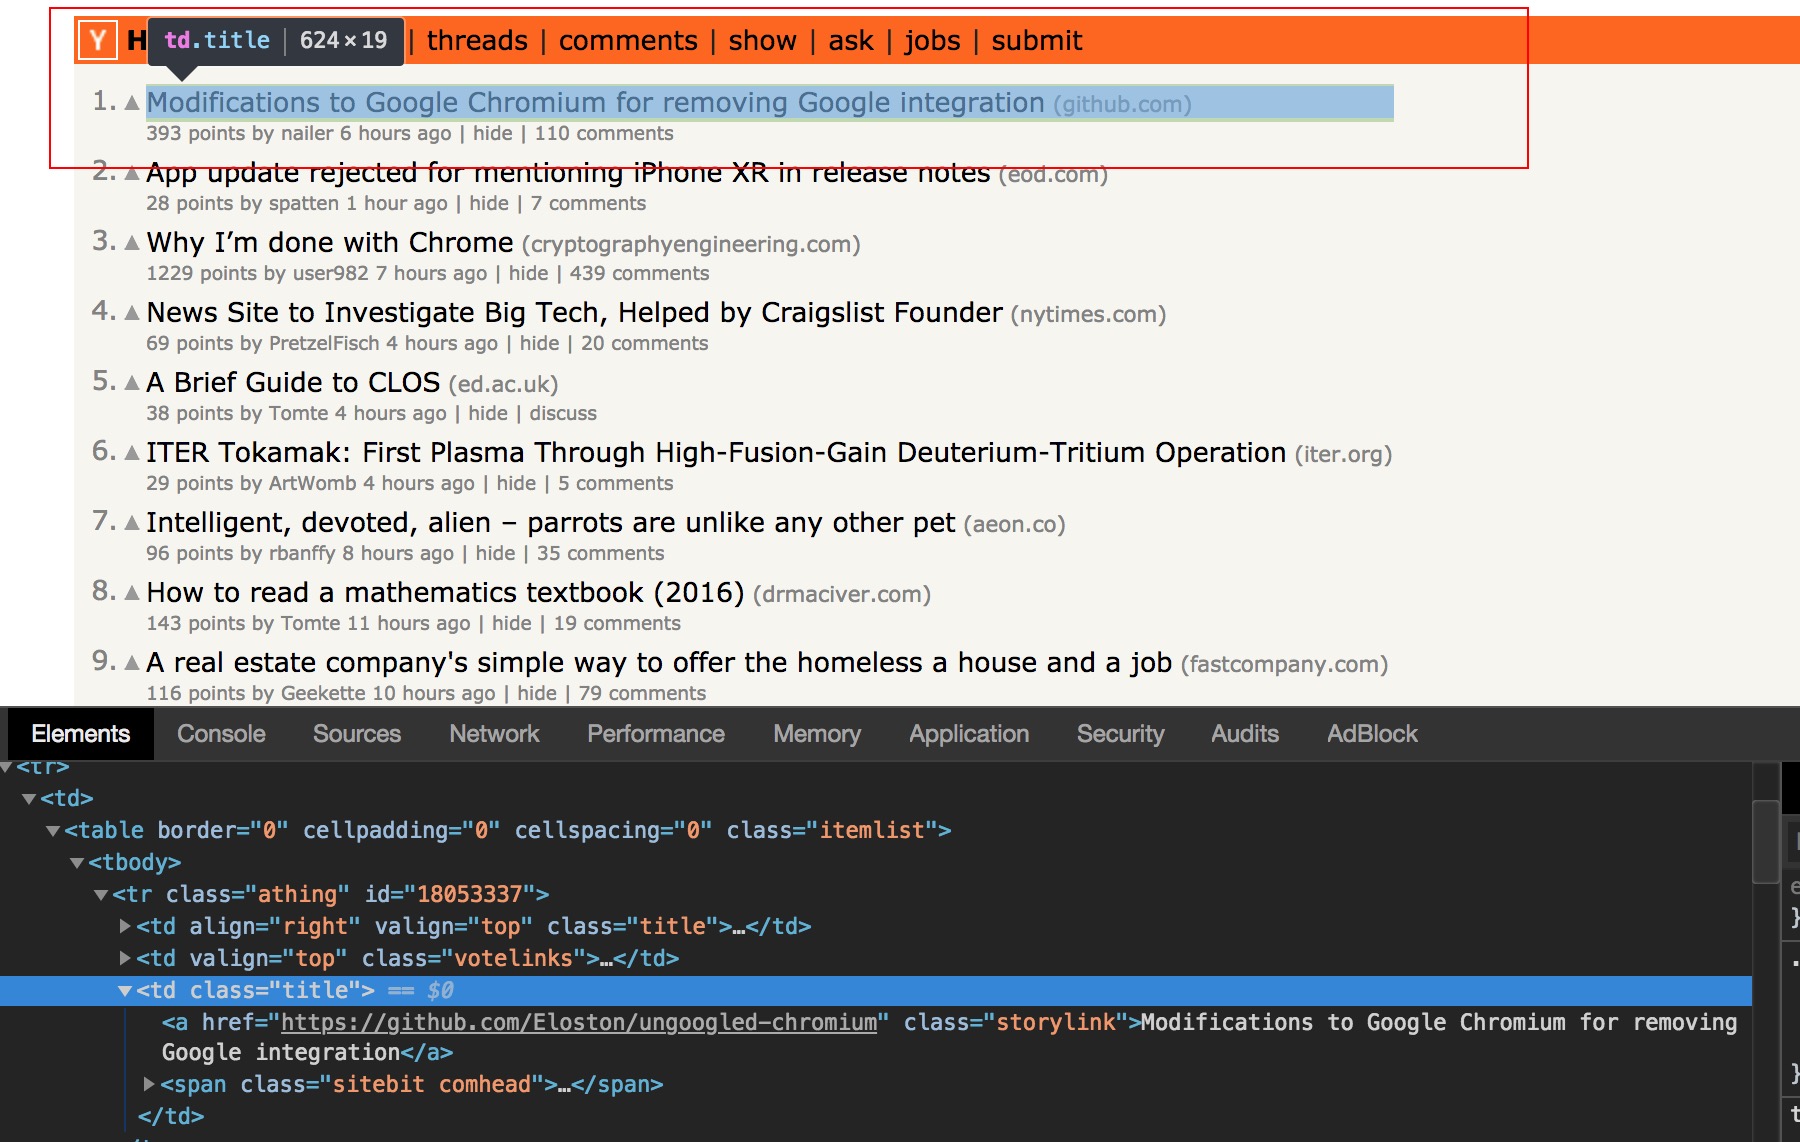
本文主要通过对Hacker News的爬取示例来展示如何使用Ruia,下图红框中的数据就是爬虫脚本需要爬取的目标:

开始前的准备工作:
第一步:定义 Item
Item的目的是定义目标网站中你需要爬取的数据,此时,爬虫的目标数据就是页面中的Title和Url,怎么提取数据,Ruia的Field类提供了以下三种方式提取目标数据:
这里我们使用CSS Selector来提取目标数据,用浏览器打开Hacker News,右键审查元素:
Notice: 本教程爬虫例子都默认使用CSS Selector的规则来提取目标数据
显而易见,每页包含30条资讯,那么目标数据的规则可以总结为:
| Param |
Rule |
Description |
| target_item |
tr.athing |
表示每条资讯 |
| title |
a.storylink |
表示每条资讯里的标题 |
| url |
a.storylink->href |
表示每条资讯里标题的链接 |
规则明确之后,就可以用Item来实现一个针对于目标数据的ORM,创建文件items.py,复制下面代码:
1
2
3
4
5
6
7
|
from ruia import AttrField, TextField, Item


class HackerNewsItem(Item):
    target_item = TextField(css_select='tr.athing')
    title = TextField(css_select='a.storylink')
    url = AttrField(css_select='a.storylink', attr='href')
|
这段代码含义是:针对我们提取的目标HTML,我们定义了一个HackerNewsItem类,其包含了两个field:
等等!target_item是什么?对于一个Item类来说,当其定义好网页目标数据后,Ruia提供两种方式进行获取Item:
- get_item:获取网页的单目标,比如目标网页的标题,此时无需定义
target_item;
- get_items:获取网页的多目标,比如当前目标网页Hacker News中的
title和url一共有30个,这时就必须定义target_item来寻找多个目标块;target_item的作用就是针对这样的工作而诞生的,开发者只要定义好这个属性(此时Ruia会自动获取网页中30个target_item),然后每个target_item里面包含的title和url就会被提取出来。
第二步:测试 Item
Ruia为了方便扩展以及自由地组合使用,本身各个模块之间耦合度是极低的,每个模块都可以在你的项目中单独使用;你甚至只使用ruia.Item、Ruia.TextField和ruia.AttrField来编写一个简单的爬虫。
脚本调试
基于这个特性,我们可以直接在脚本里面测试HackerNewsItem:
 1
 2
 3
 4
 5
 6
 7
 8
 9
10
11
12
13
14
15
16
17
18
19
20
21
22
23
24
|
import asyncio

from ruia import Item, TextField, AttrField


class HackerNewsItem(Item):
    target_item = TextField(css_select='tr.athing')
    title = TextField(css_select='a.storylink')
    url = AttrField(css_select='a.storylink', attr='href')


async def test_item():
    url = 'https://news.ycombinator.com/news?p=1'
    async for item in HackerNewsItem.get_items(url=url):
        print('{}: {}'.format(item.title, item.url))


if __name__ == '__main__':
    # Python 3.7 Required.
    asyncio.run(test_item())

    # For Python 3.6
    # loop = asyncio.get_event_loop()
    # loop.run_until_complete(test_item())
|
接下来,终端会输出以下日志:
1
2
3
4
5
|
[2021:04:04 21:37:23] INFO  Request <GET: https://news.ycombinator.com/news?p=1>
How to bypass Cloudflare bot protection: https://jychp.medium.com/how-to-bypass-cloudflare-bot-protection-1f2c6c0c36fb
The EU has archived all of the “Euromyths” printed in UK media: https://www.thelondoneconomic.com/news/the-eu-have-archived-all-of-the-euromyths-printed-in-uk-media-and-it-makes-for-some-disturbing-reading-108942/
Laser: Learning a Latent Action Space for Efficient Reinforcement Learning: https://arxiv.org/abs/2103.15793
StyleCLIP: Text-Driven Manipulation of StyleGAN Imagery: https://github.com/orpatashnik/StyleCLIP
|
终端调试
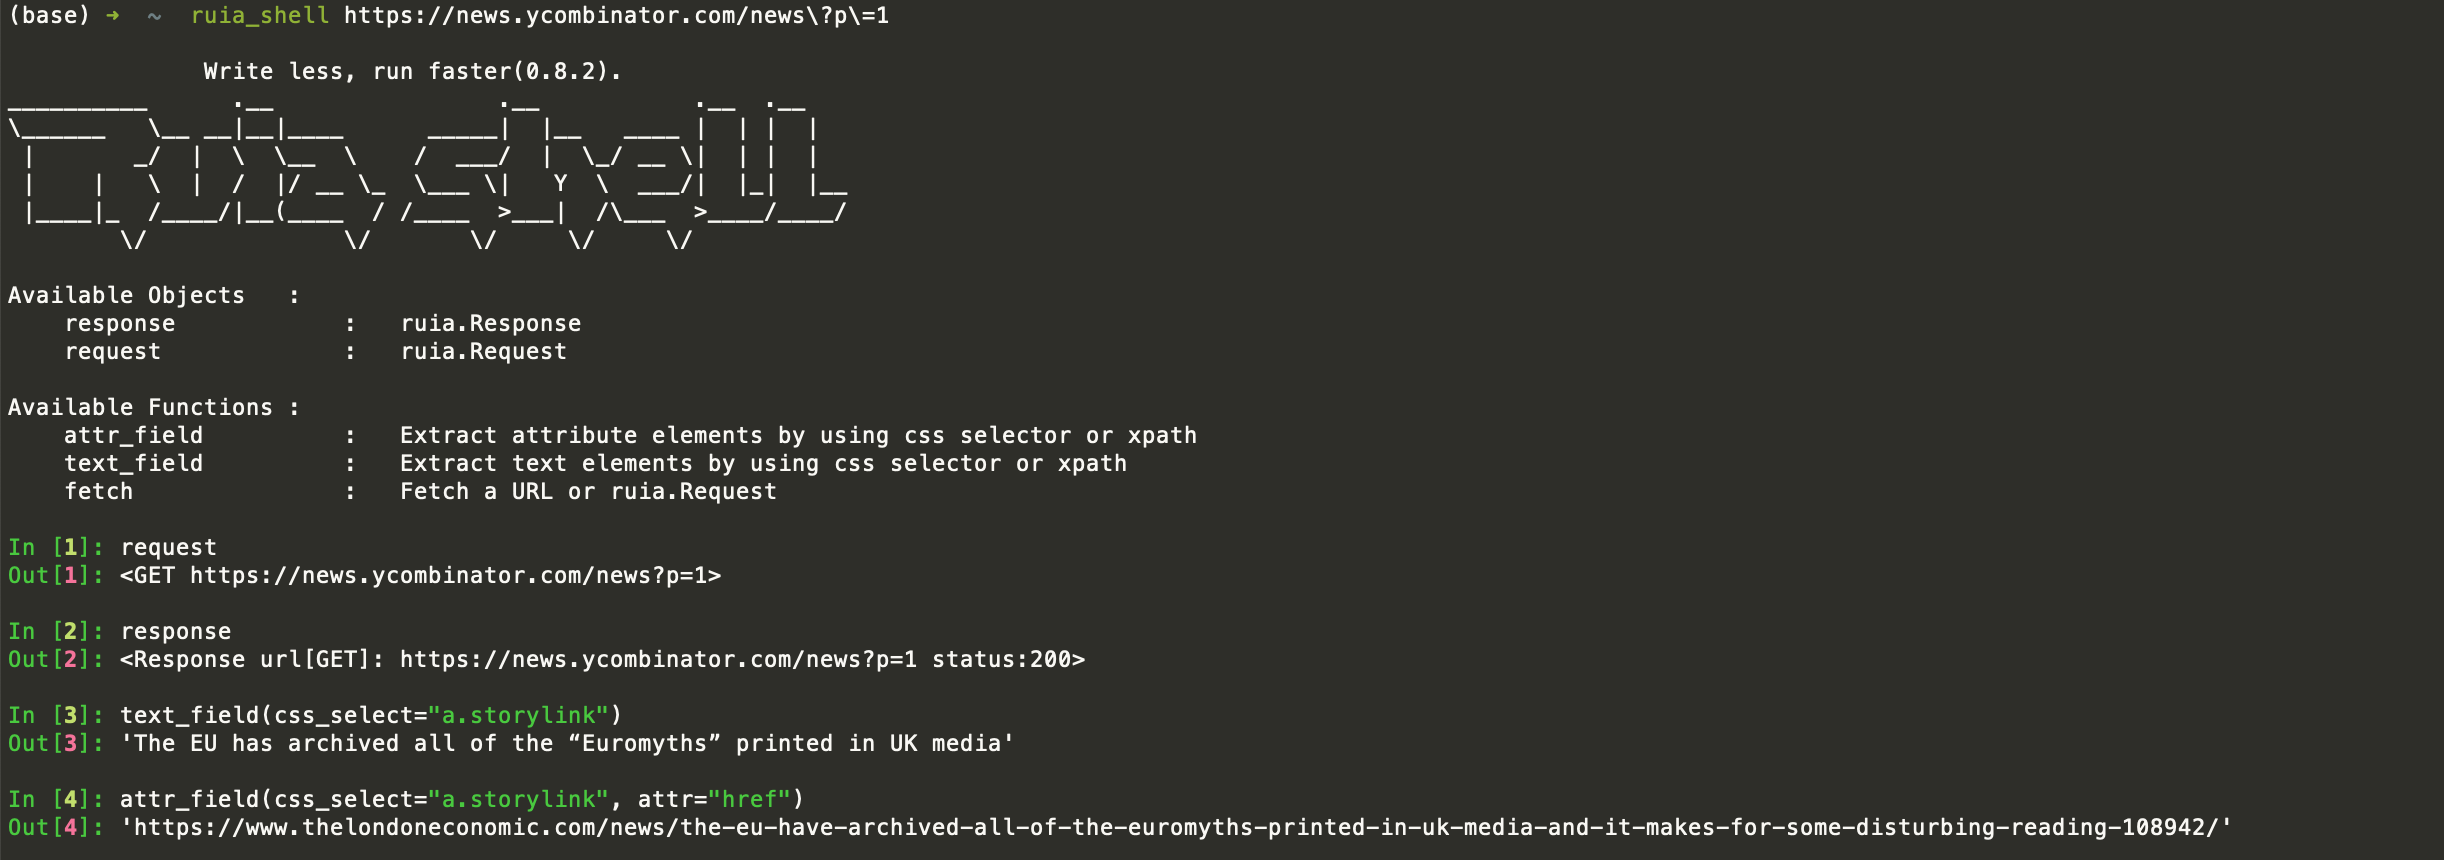
为了使Ruia的脚本调试过程更加方便优雅,开发者还可以直接使用ruia-shell插件进行调试,首先进行安装:
1
2
|
pip install -U ruia-shell
pip install ipython
|
具体使用如下:
 1
 2
 3
 4
 5
 6
 7
 8
 9
10
11
12
13
14
15
16
17
18
19
20
21
22
23
|
➜  ~  ruia_shell https://news.ycombinator.com/news\?p\=1
            ✨ Write less, run faster(0.8.2).
__________      .__                .__           .__  .__
\______   \__ __|__|____      _____|  |__   ____ |  | |  |
 |       _/  |  \  \__  \    /  ___/  |  \_/ __ \|  | |  |
 |    |   \  |  /  |/ __ \_  \___ \|   Y  \  ___/|  |_|  |__
 |____|_  /____/|__(____  / /____  >___|  /\___  >____/____/
        \/              \/       \/     \/     \/
Available Objects   :
    response            :   ruia.Response
    request             :   ruia.Request
Available Functions :
    attr_field          :   Extract attribute elements by using css selector or xpath
    text_field          :   Extract text elements by using css selector or xpath
    fetch               :   Fetch a URL or ruia.Request
In [1]: request
Out[1]: <GET https://news.ycombinator.com/news?p=1>
In [2]: response
Out[2]: <Response url[GET]: https://news.ycombinator.com/news?p=1 status:200>
In [3]: text_field(css_select="a.storylink")
Out[3]: 'The EU has archived all of the “Euromyths” printed in UK media'
In [4]: attr_field(css_select="a.storylink", attr="href")
Out[4]: 'https://www.thelondoneconomic.com/news/the-eu-have-archived-all-of-the-euromyths-printed-in-uk-media-and-it-makes-for-some-disturbing-reading-108942/'
|
如果文字不清楚,可看下图:
第三步:编写 Spider
Ruia.Spider是Ruia框架里面的核心控制类,它作用在于:
- 控制目标网页的请求
Ruia.Request和响应Ruia.Response
- 可加载自定义钩子、插件、以及相关配置等,让开发效率更高
接下来会基于前面的Item脚本继续开发,具体代码如下:
 1
 2
 3
 4
 5
 6
 7
 8
 9
10
11
12
13
14
15
16
17
18
19
20
21
22
23
24
25
26
27
28
29
30
|
"""
 Target: https://news.ycombinator.com/
 pip install aiofiles
"""
import aiofiles

from ruia import Item, TextField, AttrField, Spider


class HackerNewsItem(Item):
    target_item = TextField(css_select='tr.athing')
    title = TextField(css_select='a.storylink')
    url = AttrField(css_select='a.storylink', attr='href')


class HackerNewsSpider(Spider):

    start_urls = [f'https://news.ycombinator.com/news?p={index}' for index in range(3)]
    concurrency = 3
    # 设置代理
    # aiohttp_kwargs = {"proxy": "http://0.0.0.0:8765"}

    async def parse(self, response):
        async for item in HackerNewsItem.get_items(html=await response.text()):
            yield item

    async def process_item(self, item: HackerNewsItem):
        """Ruia build-in method"""
        async with aiofiles.open('./hacker_news.txt', 'a') as f:
            await f.write(str(item.title) + '\n')
|
本段代码的作用是:
爬取Hacker News的前三页内容,设置并发数为3,然后全部持久化到文件hacker_news.txt
开发者实现HackerNewsSpider必须是Spider的子类,代码中出现的两个方法都是Spider内置的:
- parse:此方法是
Spider的入口,每一个start_urls的响应必然会被parse方法捕捉并执行;
- process_item:此方法作用是抽离出对
Item提取结果的处理过程,比如这里会接受自定义Item类作为输入,然后进行处理持久化到文件。
第四步:运行 Start
希望Ruia可以为你带来编写爬虫的乐趣 :)
一切准备就绪,启动你的爬虫脚本吧!
 1
 2
 3
 4
 5
 6
 7
 8
 9
10
11
12
13
14
15
16
17
18
19
20
21
22
23
24
25
26
27
28
|
import aiofiles

from ruia import AttrField, Item, Spider, TextField


class HackerNewsItem(Item):
    target_item = TextField(css_select="tr.athing")
    title = TextField(css_select="a.storylink")
    url = AttrField(css_select="a.storylink", attr="href")


class HackerNewsSpider(Spider):

    start_urls = [f"https://news.ycombinator.com/news?p={index}" for index in range(3)]
    concurrency = 3

    async def parse(self, response):
        async for item in HackerNewsItem.get_items(html=await response.text()):
            yield item

    async def process_item(self, item: HackerNewsItem):
        """Ruia build-in method"""
        async with aiofiles.open("./hacker_news.txt", "a") as f:
            await f.write(str(item.title) + "\n")


if __name__ == "__main__":
    HackerNewsSpider.start()
|
Tips:如果你想在异步函数里面调用,执行await HackerNewsSpider.start() 即可
不到30行代码,你就实现了对Hacker News的爬虫脚本,并且脚本带有自动重试、并发控制、语法简单等特性。
通过这个例子,你已经基本掌握了Ruia中Item、Middleware、Request等模块的用法,结合自身需求,你可以编写任何爬虫,例子代码见hacker_news_spider。
第五步:扩展
Middleware
Middleware的目的是对每次请求前后进行一番处理,分下面两种情况:
比如此时爬取Hacker News,若希望在每次请求时候自动添加Headers的User-Agent,可以添加以下代码引入中间件:
 1
 2
 3
 4
 5
 6
 7
 8
 9
10
11
12
13
14
15
16
17
18
19
20
21
22
23
24
25
26
27
28
29
30
|
from ruia import AttrField, Item, Middleware, Spider, TextField

middleware = Middleware()


@middleware.request
async def print_on_request(spider_ins, request):
    ua = "ruia user-agent"
    request.headers.update({"User-Agent": ua})
    print(request.headers)


class HackerNewsItem(Item):
    target_item = TextField(css_select="tr.athing")
    title = TextField(css_select="a.storylink")
    url = AttrField(css_select="a.storylink", attr="href")


class HackerNewsSpider(Spider):

    start_urls = [f"https://news.ycombinator.com/news?p={index}" for index in range(3)]
    concurrency = 3

    async def parse(self, response):
        async for item in HackerNewsItem.get_items(html=await response.text()):
            yield item


if __name__ == "__main__":
    HackerNewsSpider.start(middleware=middleware)
|
这样,程序会在爬虫请求网页资源之前自动加上User-Agent,针对自动UA的功能点,Ruia已经专门编写了一个名为ruia-ua的插件来为开发者提升效率,使用非常简单,代码示例如下:
 1
 2
 3
 4
 5
 6
 7
 8
 9
10
11
12
13
14
15
16
17
18
19
20
|
from ruia import AttrField, TextField, Item, Spider
from ruia_ua import middleware


class HackerNewsItem(Item):
    target_item = TextField(css_select='tr.athing')
    title = TextField(css_select='a.storylink')
    url = AttrField(css_select='a.storylink', attr='href')


class HackerNewsSpider(Spider):
    start_urls = ['https://news.ycombinator.com/news?p=1', 'https://news.ycombinator.com/news?p=2']

    async def parse(self, response):
        # Do something...
        print(response.url)


if __name__ == '__main__':
    HackerNewsSpider.start(middleware=middleware)
|
MongoDB
对于数据持久化,你可以按照自己喜欢的方式去做,前面实例中介绍了如何将目标Item持久化到文件中。
如果想将数据持久化到数据库(MongoDB)中,该怎么做?此时就到了凸显Ruia插件优势的时候了,你只需要安装ruia-motor:
1
|
pip install -U ruia-motor
|
然后再代码中引入ruia-motor:
 1
 2
 3
 4
 5
 6
 7
 8
 9
10
11
12
13
14
15
16
17
18
19
20
21
22
23
24
25
26
27
28
|
from ruia_motor import RuiaMotorInsert, init_spider

from ruia import AttrField, Item, Spider, TextField


class HackerNewsItem(Item):
    target_item = TextField(css_select="tr.athing")
    title = TextField(css_select="a.storylink")
    url = AttrField(css_select="a.storylink", attr="href")


class HackerNewsSpider(Spider):
    start_urls = [f"https://news.ycombinator.com/news?p={index}" for index in range(3)]
    concurrency = 3
    # aiohttp_kwargs = {"proxy": "http://0.0.0.0:1087"}

    async def parse(self, response):
        async for item in HackerNewsItem.get_items(html=await response.text()):
            yield RuiaMotorInsert(collection="news", data=item.results)


async def init_plugins_after_start(spider_ins):
    spider_ins.mongodb_config = {"host": "127.0.0.1", "port": 27017, "db": "ruia_motor"}
    init_spider(spider_ins=spider_ins)


if __name__ == "__main__":
    HackerNewsSpider.start(after_start=init_plugins_after_start)
|
数据库中可以看到目标字段:
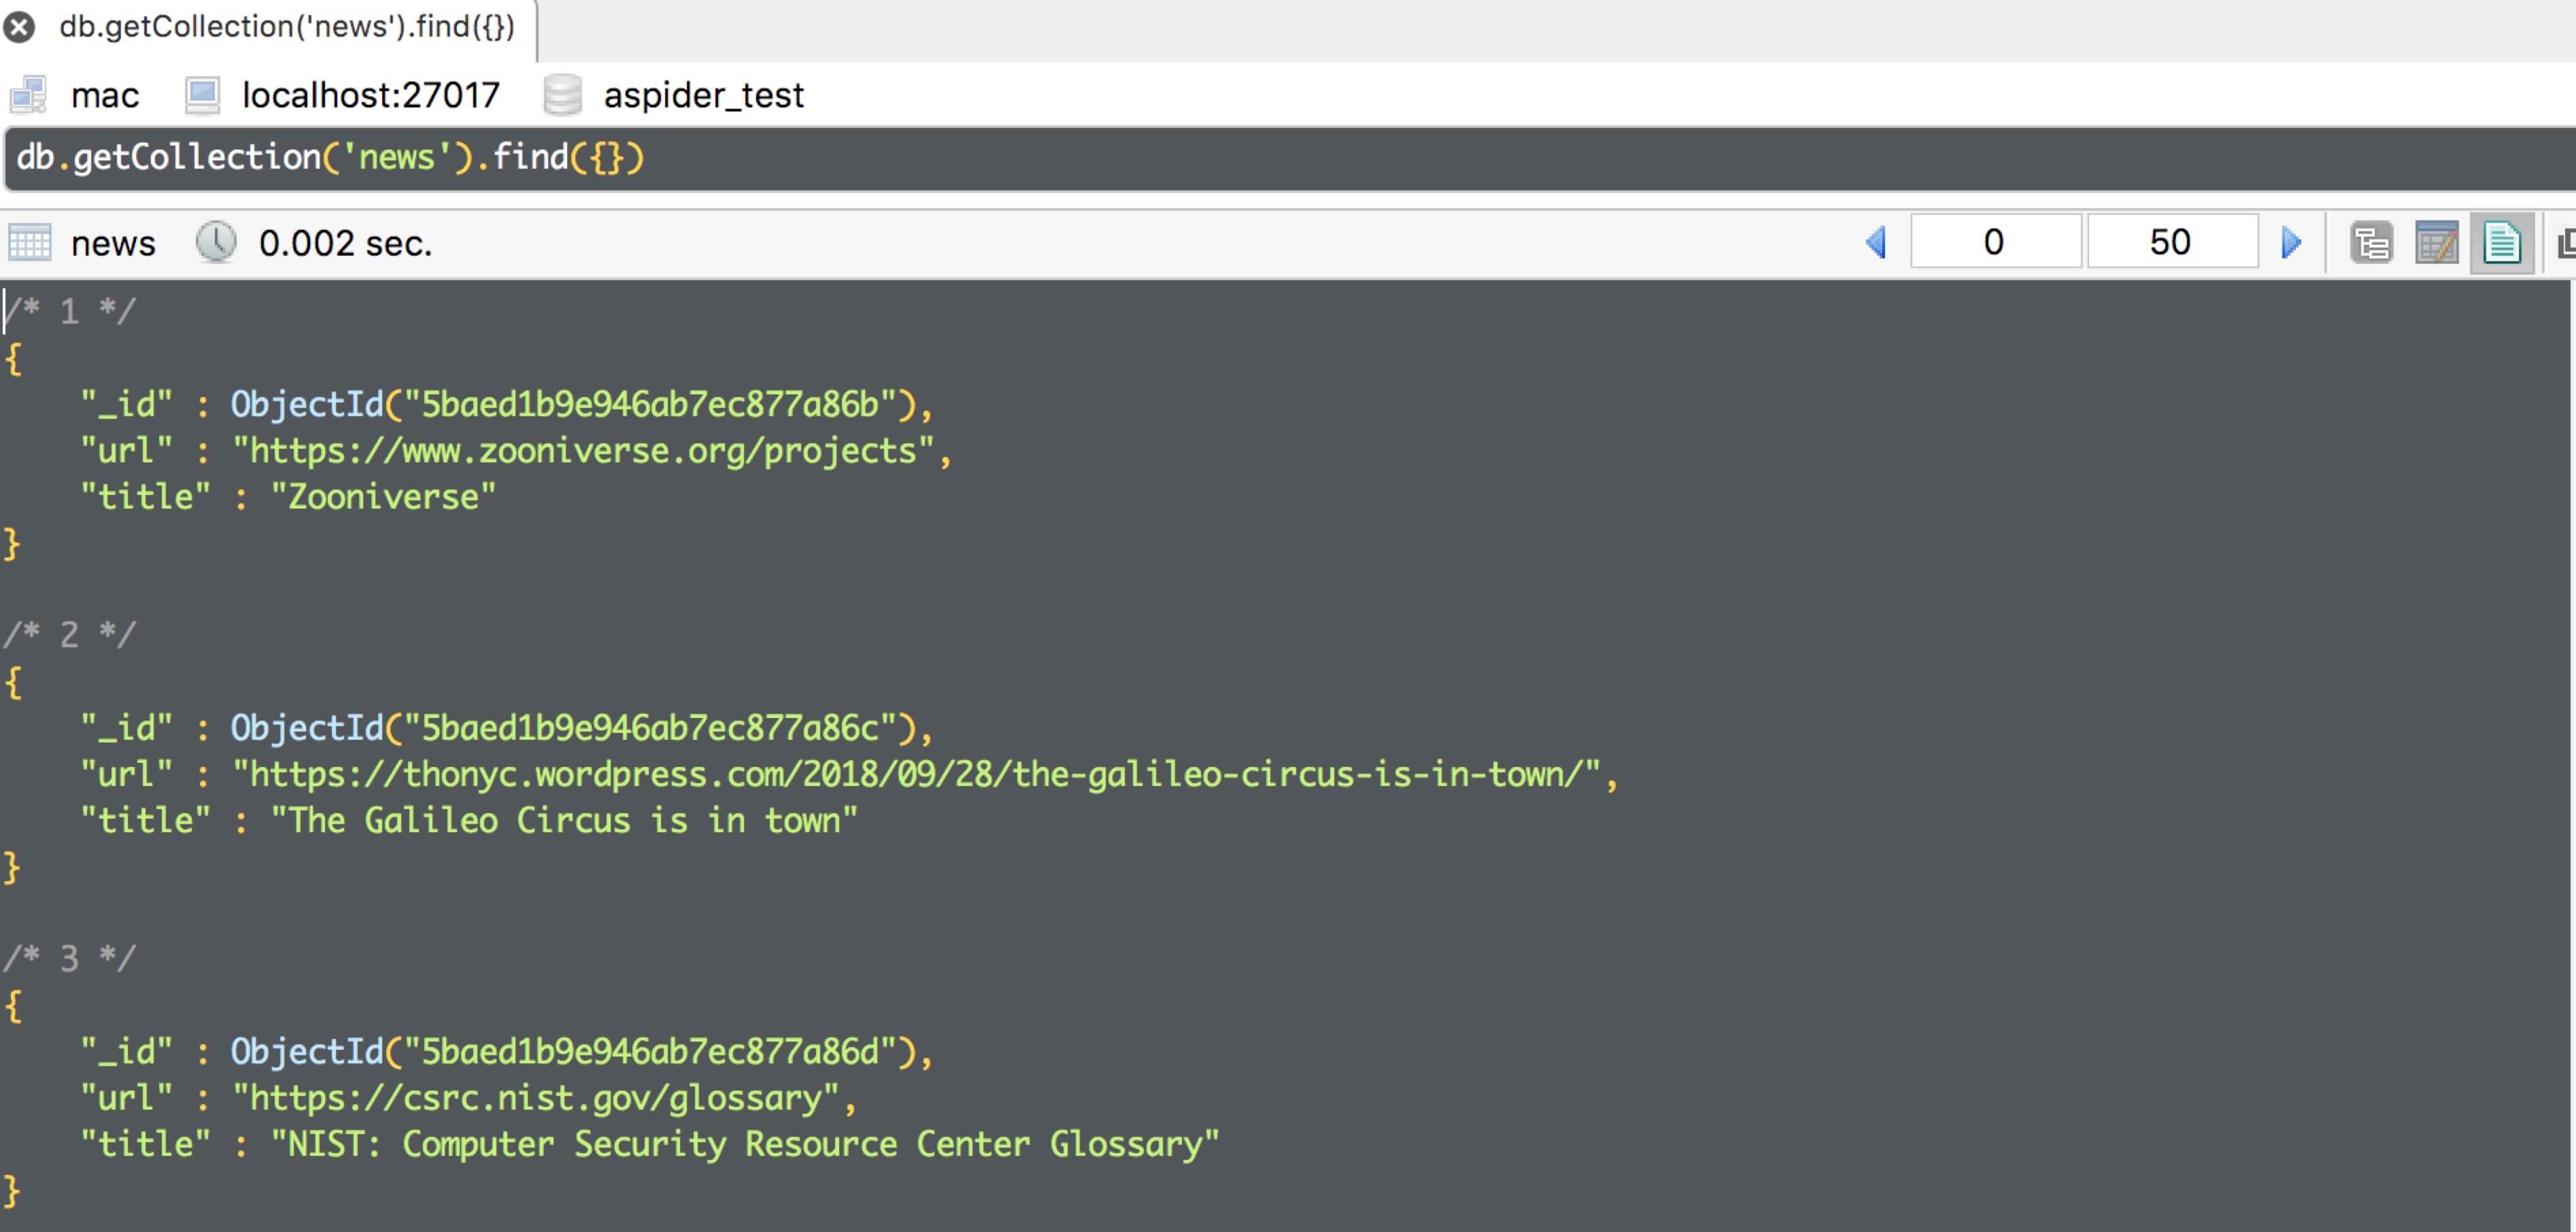
是不是更简单了呢?